The Masquelet technique rebuilds a bone gap in two planned stages, several weeks apart. A temporary spacer first encourages the body to form a biological lining, and graft is placed inside it later.
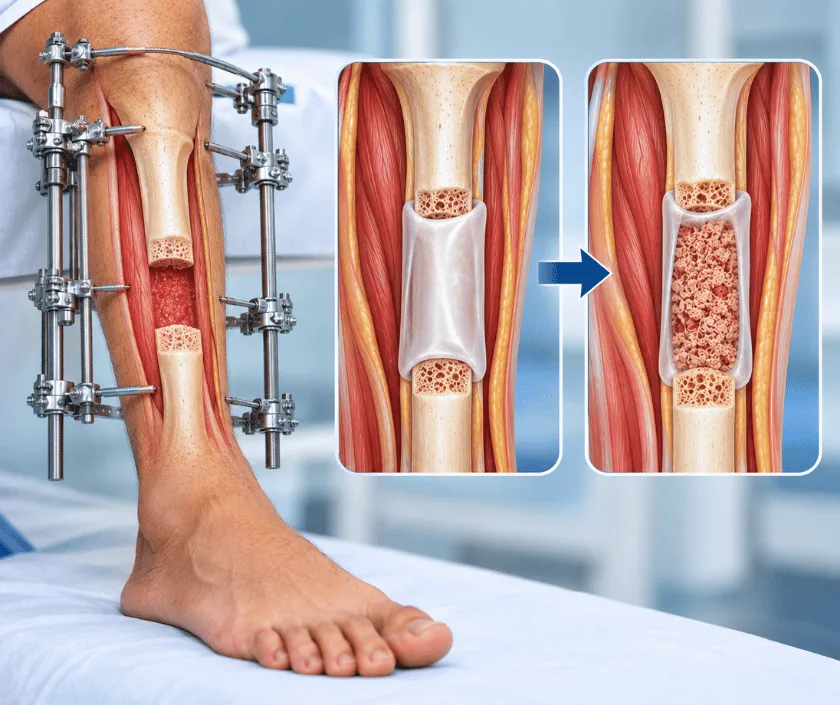
The Masquelet technique treats a bone gap in two operations. At the first, dead and infected bone is removed and a cement spacer is placed in the gap, which leads the body to form a membrane around it. Some weeks later the spacer is taken out and bone graft is packed into the lined space to heal.
When a segment of bone is missing, packing graft straight into an open gap often fails. The graft is resorbed, or infection returns, because nothing holds it or feeds it. The Masquelet technique gets around this by borrowing a reaction the body produces naturally. Placing a block of bone cement in the gap prompts a thin, well supplied membrane to grow around it over a few weeks.
At the first operation, dead and infected bone is removed until healthy bleeding bone is reached, the leg is stabilised with a nail, plate or frame, and the spacer is shaped into the defect. Soft tissue cover is arranged at the same time if the bone is exposed. Waiting then follows, usually several weeks, while the membrane matures.
The second operation opens the membrane carefully, removes the cement and fills the lined cavity with bone graft, most often taken from the pelvis. Because the membrane is left intact, it holds the graft in place and supplies it with blood. Healing then proceeds over many months.
This approach suits people with a bone gap who can wait through a planned interval and attend for a second operation.
Imaging shows the size of the gap and blood tests help judge infection. The soft tissue envelope is examined, since cover may need arranging alongside the first operation.
Dead and infected bone is removed, the leg is stabilised and a cement spacer is shaped into the gap. Samples are sent so antibiotics can be targeted accurately.
Several weeks pass while the membrane forms around the spacer. Wounds heal during this time and antibiotics are completed as advised.
The membrane is opened gently, the spacer is removed and graft from the pelvis is packed into the cavity. The membrane is then closed over the graft.
Fixation stays in place while the graft turns into solid bone. Imaging at intervals guides when weight bearing can safely increase.
After each stage the leg is elevated and rested. Pain relief and antibiotics are given, and walking with crutches begins under supervision when the team allows.
Wounds are reviewed and stitches removed. Movement exercises for the knee and ankle begin, and most patients are home during this period.
Between the stages, or after grafting, imaging checks progress. Weight bearing advances gradually according to what the pictures show.
Graft continues turning into solid bone. Fixation stays until imaging confirms strength, and physiotherapy keeps working on movement and walking.
Many people go on to a leg that carries weight, though healing after grafting takes months and further procedures are sometimes needed. Graft may consolidate unevenly, and a second grafting is occasionally required. The donor area on the pelvis stays sore for a while. Recovery can vary, so patience through the waiting period and beyond is essential.
Both stages carry risk, and the interval between them is a period when problems can appear.
The waiting period is not idle time, and how you manage it affects what the second operation can achieve.
The spacer is temporary. Its purpose is to create the membrane, and real bone rebuilding happens at the second stage.
The membrane is at its most useful within a certain window. Waiting far too long reduces the benefit of the first stage.
Graft must first turn into living bone, which takes months. Weight bearing therefore advances more slowly than after a simple fracture.
The donor site has its own recovery and can be sore for weeks, so it is discussed properly before surgery.
Two stage bone reconstruction is explained as a single plan with a defined waiting period, so families know what is coming. Elegance Clinic arranges soft tissue cover and bone work together where both are needed.

Because two operations are planned, the estimate covers both stages, the spacer, fixation, hospital stays, graft harvesting and the imaging that follows. Any flap cover needed at the first stage is listed separately so the total is clear before admission.
A written estimate is prepared after assessment. Where accident cover or an employer scheme applies, the office will explain which documents insurers usually ask for and how approval tends to proceed.
These are the questions that come up most often in consultation. If yours is not here, send it on WhatsApp and the team will reply, usually the same day.
Ask your question →The first removes dead bone and places a spacer, which prompts the body to form a living membrane. Only at the second operation is graft placed inside that lining. Doing both at once would leave the graft without the protection that makes it work.
Usually several weeks, chosen so the membrane has matured but not begun to thin. The exact interval depends on how the wound heals and whether infection markers have settled, so it is confirmed at review rather than fixed in advance.
Flap cover after an open fracture sits in the band Rs 1.8L to Rs 4.5L, and the figure is case based. A written estimate covering both operations, fixation, graft harvesting and imaging is prepared after assessment.
Most often from your own pelvis, which supplies living bone cells. That donor area is sore for some weeks afterwards and leaves a scar. Where more volume is needed, additional graft options are discussed beforehand.
Neither is universally better. This technique avoids months in a frame, while transport suits very large gaps and can correct length. The choice depends on the gap, the soft tissue and what you can manage at home.
It can, particularly if any infected bone was left behind. Thorough clearance at the first stage and targeted antibiotics reduce that risk considerably. Regular review afterwards helps pick up any return early.
Not for several months, because graft has to become solid bone first. Weight bearing increases gradually according to what imaging shows at each review. Following that schedule protects the reconstruction from breaking down.
Each technique below has its own page explaining how it works and when it is chosen.
Seeing patients from across the city and beyond: read about the practice on the plastic surgeon in Surat page, or check what a written estimate covers on the costs and insurance page.
